For the longest of times, Firefox users had to rely on extensions or other means to integrate content blocking in the open source browser. Extensions like NoScript or uBlock Origin provided Firefox users with excellent blocking capabilities.
However, only a fraction of all users of the browser installed these extensions. Mozilla’s argument that Firefox was a privacy-focused browser always fell a bit short because of it.
If you have installed Firefox 153.2 for iOS, you may notice a new option to “block ads” in the settings under browsing after enabling the “Ad Blocker” feature flag in the browser.
The setting appears to be enabled by default, but it is unclear whether that is only for the beta or if the final stable release will also have the content blocker enabled by default — or get it at all.
According to user tests, the implementation lacks user interface visibility, just like the test implementation in desktop Firefox. It remains to be seen where this will lead to. Will Firefox get a native content blocker just like Brave and some other Chromium-based browsers like Opera or Vivaldi? It is difficult to tell right now, but since it is in Beta, it seems possible that the next major Firefox for iOS release will include a built-in content blocker.
What is your take on this? Rely on native content blockers or extensions? Let us know in the comments below.
Earlier this month, I wrote about a new version of the Windows tweaker Win11Debloat and its new feature to block automatic driver companion app installations on Windows. I also listed native Windows options to remove the LG Monitor App and unwanted installations.
This came after LG was found to push its Monitor App via Microsoft’s cloud to Windows devices with LG monitors. The app gives users some control over monitor features and also popup ads.
The outcry must have been loud enough to reach the higher ups at Microsoft, as the company just posted an official announcement on X:
Thanks again for bringing this to our attention. We’ve connected with the team at LG and as an immediate next step, they have agreed to disable the McAfee pop-up from their app. We appreciate LG working with us toward a shared goal of a better experience for our mutual customers.…
According to the post of Microsoft Executive Vice President, Windows and Devices, Pavan Davuluri’s post, Microsoft has come to an agreement with LG regarding the matter. LG, according to Microsoft, will stop showing the popup ad on Windows devices.
While that is the right thing to do, considering that the app auto-installed and started to show the popup without users knowing what hit them, it does not address the elephant in the room: nothing is keeping LG or any other device maker from doing so again in the future.
At the very least, Microsoft should introduce new regulations that prevents a scenario like this from happening in the future. Should companies be allowed to display ads or popups in their apps? Certainly, but not when they have the power to auto-install software or updates on user devices.
Until that happens, it may be a good idea to block the automatic installation of manufacturer apps on your Windows devices to avoid these scenarios. You may still download and install (most) apps manually from the Microsoft Store or the manufacturer’s website.
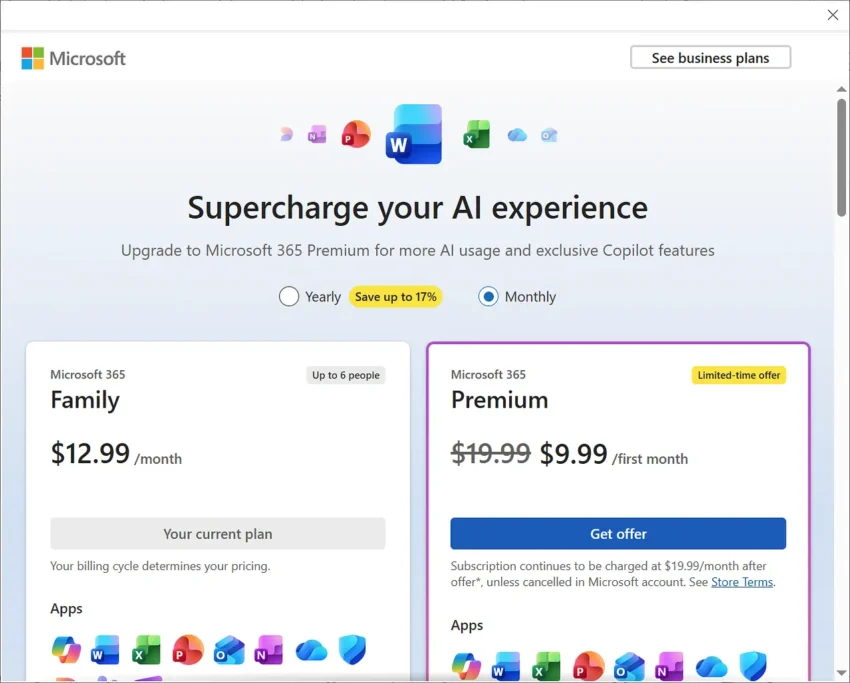
If you use Microsoft 365, you may use the Office apps on your desktop devices that are part of the subscription package.
If you do, you may have noticed a new button in the title bar of any Office app that you launch on your device. It says “Upgrade your plan” and has a red dot attached to it to get your attention.
When you click on it, you get an option to upgrade to a new plan that costs more. Microsoft says that this upgrade gives customers “more AI usage and exclusive Copilot features”.
While you can close the window that opened, you may notice that the advertising button remains attached to the title bar. To make matters worse, Microsoft is not giving you any option to hide or remove it, let alone configure that something like it should never be shown again.
Someone at Microsoft must have thought that the upselling in the apps is a great way to increase revenue. The company has probably the numbers to back this up. While you anger some customers, you may get others to upgrade their plan and increase your bottom line in the process.
However, shoving an ad in the face of paying customers may not be the brightest of ideas, at least not this way. Microsoft has displayed ads in various products, including Windows, in the past years. All in an effort to push products, make additional sales or get users to upgrade.
It is probably one of the reasons why Windows has a less than stellar reputation at this point.
The strategy is always the same: add the ad in a location that gets lots of eyes, ignore the voice that questions the idea and also any user comment that is critical of the addition. Then, when things get too heated, remove it and claim that something like this will never happen again.
For anyone fed up with this, LibreOffice, a free and ad-free Office suite, may be a suitable replacement.
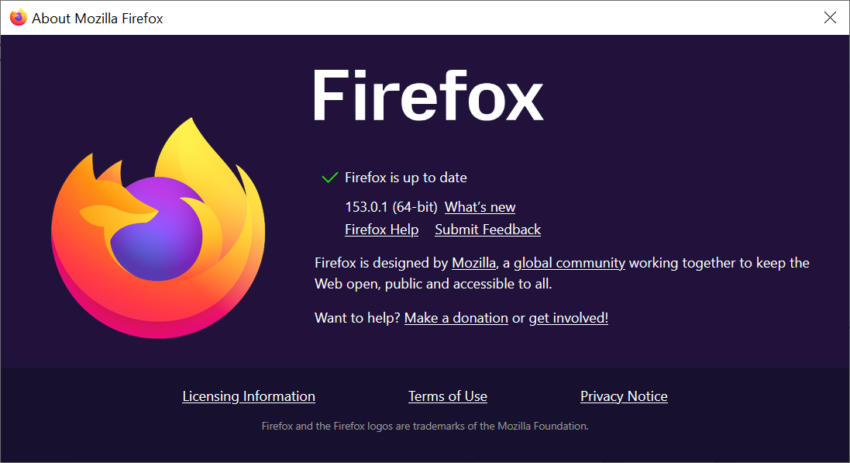
Mozilla released a new stable version of its Firefox web browser a moment ago. Firefox 153.0.1 is a point update for the open source browser that is a bug-fix release for the most part. Good news from the security front: there are no security issues that needed fixing in the release.
Note: There is one unresolved issue that may affect Firefox users on Windows. Windows users who experience a crash after installing the update may need to download Firefox manually from Mozilla’s website to install it over the current broken installation. You could also wait with the installation of this update until the issue is resolved for good.
Probably the biggest fixes are several crashes that users of older versions of the browser may have experienced:
Fixed a startup crash on Windows that could occur after updating. It could happen when “some of the application’s internal files could not be loaded”. The updated Firefox should start properly now, but Mozilla notes, that some “parts of the interface” may not display correctly as a consequence.
Fixed a crash that could occur when loading a frame using a javascript: address.
Fixed a crash that could happen while typing in editable areas of a webpage.
Other than that, there is a fix for audio playing silently on some sites after pausing and resuming playback, and a fix for the New Tab page flashing “a few seconds after the page loaded” on systems with custom wallpapers.
Here is the list of the remaining fixes in the release:
Search engines that are already installed are not labeled as “New” anymore.
Pointer lock is improved, which is used by games and other web content to contain the pointer in the browser window.
Fixed that View Page Source would not load blob: documents. Also fixed a time-out issue on documents that inherit their origin.
Fixed an issue with the Developer Tool’s Inspector Rules view. Pseudo-elements could only be expanded once per selected element.
The update to Firefox 153.0.1 is available already. It should be installed automatically on most systems, but you can speed it up by selecting Help > About Firefox in the main menu.
Nothing lasts forever and this is especially true for software and products these days. Microsoft products and services are no exception, as several will reach end of servicing later this year.
This overview lists the major products that won’t receive any updates anymore once support ends.
Windows & Operating Systems
Windows 11, Version 24H2 (Home & Pro): Servicing ends October 13, 2026. (Users will need to update to version 25H2 or newer).
Windows 11, Version 23H2 (Enterprise, Education, & IoT Enterprise): Servicing ends November 10, 2026.
Windows 11 SE: Servicing ends October 1, 2026. Product retirement.
Windows 10 2016 LTSB / IoT Enterprise LTSB 2016: Extended Support ends October 13, 2026.
Windows Server 2012 / 2012 R2 (ESU Year 3): The final year of Extended Security Updates concludes on October 13, 2026.
Office & Productivity Suites
Office 2021 & Office LTSC 2021 (Windows & Mac): Support ends on October 13, 2026. This covers individual applications including Word, Excel, PowerPoint, Outlook, Access, OneNote, Visio, and Project 2021.
Microsoft Publisher: Completely retired and removed from Microsoft 365 subscriptions after October 2026.
Servers & Business Applications
SQL Server 2016: Extended Support ends July 14, 2026.
SharePoint Server 2016 & 2019: Extended Support ends July 14, 2026.
Project Server 2016 & 2019: Extended Support ends July 14, 2026.
Exchange Server & Skype for Business Server (ESU Period 2): Final ESU phase expires October 31, 2026.
Dynamics CRM 2016, NAV 2016, GP 2016, & C5 2016: Extended Support ended between January and April 2026.
Microsoft Configuration Manager (Version 2409): Servicing ended June 6, 2026.
Developer Frameworks & Tools
.NET 9 (Standard Term Support): End of servicing on May 12, 2026.
.NET 8 (LTS): End of servicing on November 10, 2026.
PowerShell 7.4 (LTS): End of servicing on November 10, 2026.
Visual Studio 2022 (LTSC 17.10 & 17.12): Servicing ends on January 13, 2026 (17.10) and July 14, 2026 (17.12).
Key Milestone Summary
Product / Service
Milestone Date
Status
Windows 11, v24H2 (Home/Pro)
October 13, 2026
End of Servicing
Windows 11, v23H2 (Enterprise)
November 10, 2026
End of Servicing
Windows Server 2012 / R2 (ESU)
October 13, 2026
Final ESU Year Expiration
Office LTSC 2021 / Office 2021
October 13, 2026
End of Support / Retirement
As always, most of the products will continue to work even after retirement or end of servicing. Microsoft won’t issue security patches or non-security fixes anymore, and will also end technical support. This increases the vulnerability risk.
Google announced a new option to sign-in to a Google account this week. Called “Selfie Video”, it is specifically designed for signing-in when you are locked out or use a device that is not your “usual phone or computer”.
However, for this to work, it is necessary to set up Selfie Video prior to making use of it, Google notes.
Note: I got the “Selfie isn’t available as a sign-in option for this account” error when trying to set this up for tests. Not sure whether the feature is region-locked, as Google does not make any mentions of limitations.
Setting up a selfie video is simple: You just look at your device’s camera and complete a few short, guided head movements to capture multiple angles.
If you’re having trouble signing in later on, you just take another selfie to get back into your account. Selfie video compares the new video to the one you set up to confirm it is really you and help you get back into your account.
What about privacy and security? Google says the selfie video “is recorded and securely stored with your consent” and only used for sign in help, unless you decide to “share it for additional purposes”. The video is encrypted at rest according to Google, and there are “multiple layers of security to help prevent impersonation attempts”.
Here is my take: while this may look like yet another feature to get more data from its users, it is actually not the worst of ideas in some cases. First, it is optional, which means that you don’t have to use it and the majority of Google users probably won’t.
The main advantage is that this is independent of devices or security keys. If you don’t have access to your smartphone or computer anymore, you may lose access to your accounts or have troubles authorizing yourself. This selfie option could provide a way out in emergency situations. That is, provided that it works as advertised.
For users heavily invested — and thus trusting — in Google’s ecosystem, it could be an option for disaster recovery.
What about you? Would you use such a feature? Let me know in the comments below.
Ah Google Search, everyone’s favorite search engine that started out as an excellent source for Internet resources using links and is openly being turned into a service that eats everything that is in its way, even the very sites that fuel it.
A new report, cited by the Wall Street Journal, suggests that major US publishers have noticed sharp drops in organic Google Search traffic between June 2025 and June 2026.
According to the report, sites noticed decreases of organic traffic by up to 85 percent and the main reason for that appears to be AI Overviews. When Google Search displays an AI generated overview on a search results page, traffic to sites drops by about 60 percent according to the study. This leaves Discover traffic as the remaining traffic source from Google, but this comes with its own set of caveats, including a tendency for clickbait.
Major US publishers and sites, including Reddit, Politico and Business Insider, may turn to drastic measures to put an end to Google’s strategy of becoming the one and only destination on the Internet that users need.
Reddit, the Wall Street Journal reports, is considering dropping a potential renewal of its $60 million per year deal with Google. This would disallow Google from using the content published on Reddit for AI training and also prevent the company from showing Reddit content in its AI overviews.
Apart from losing the money, Reddit might also notice another drop in referrals from Google as a consequence, as it would likely no longer be listed by the AI Overviews feature.
My personal take: Google’s decisions have led to a decline in Internet blogs, at least in the tech sector. Independent owners of sites like Freeware Genius stopped publishing or pulled their sites entirely from the Internet because of Google. Now, the beneficiaries of Google’s algorithmic changes are facing a similar situation. Google is keeping the users that it used to send to these sites and now it is their business model that is in jeopardy.
Here is the outcome: Some will survive, as they may provide value that Google can’t replicate. Some will merge, others will vanish. Even big publications or sites may go down. Google might eventually notice that AI can’t generate fresh information on its own though.
Mozilla released Firefox 153.0 to the public yesterday. The new version of the open source browser comes with a good range of new features and changes, including some that are important for privacy and security.
The list of changes is long, but there are several standout features in changes. For one, Mozilla integrated the decade-old Containers feature of the browser directly into Firefox as an out-of-the-box feature.
Containers allow you to separate websites and data. The main idea is to contain data within containers, which means that anything that runs outside can’t access the container data. Whether it is a coincidence that Mozilla is making the feature more visible after Brave introduced it recently is unclear, but it could give Containers a much needed boost.
There are various methods to open sites in Containers. You can right-click on any open tab and select the “Open in new Container tab” option, or right-click on the new-tab-button instead.
Firefox ships with the usual four default containers personal, work, banking, and shopping, which you can edit. You can also add new containers or enable “Select a container for each new tab” to automatically open the container picker when opening a new tab.
The Multi-Account Container add-on is still useful, as it extends the functionality. You can use it to force-launch specific sites in a container and use other exclusive features.
As far as security and privacy are concerned, there are three additional changes that are noteworthy:
Extensions do not gain access to local files by default anymore. You can still grant them permission using the new “Access local files on your computer” permission.
Firefox now requires websites to request permission before connecting to devices on local networks, or to apps and services on a device.
Veteran Firefox users may remember the cookieBehavior preference. The values 3 (Allows third-party cookies only if the eTLD+1 already has at least one cookie set in a first-party context) and 4 (Blocks cookies from domains classified as trackers.) are being removed. They are hidden in Firefox 153 and may be removed as early as Firefox 155. Mozilla replaces them with what it says modern values. Link
Here are the remaining important changes and new features in Firefox 153:
HDR video playback is coming to Windows on devices that support it. Make sure that HDR video streaming is enabled under Settings > Display.
Share > Generate QR Code is a new option to share pages.
PDF Editor can now merge multiple PDFs by dragging them into the PDF sidebar and add new pages to PDFs.
Type “pick color” in the address bar to quickly copy a color code from the active page.
On Apple devices, Firefox supports Globe-F now.
Local permissions are not highlighted in red in the address bar.
You can launch Firefox labs now by typing labs in the address bar.
Last but not least, Mozilla patched several security issues in Firefox. The aggregate rating is high and there is no mention of exploits in the wild.
Windows has this interesting feature that enables OEMs to push software to user devices. This installs the apps automatically on unmanaged devices and supposedly helps get the most out of certain devices, such as monitors or printers.
While that sounds useful in theory, this feature has been abused in the past. The most recent example is LG installing its Monitor App on Windows PCs and using it to display advertisement for McAfee products.
Since this is unwanted by the vast majority of users, it is fair to say that this falls into the misuse of power category.
You can use Win11Debloat, a popular Windows tweaker, to get rid of the app and block LG from installing it again. Or, you could do it manually.
Here are the steps:
Remove the existing LG Monitor App
Because this is packaged as a standard modern Windows app, it can be uninstalled normally without needing to scrub your registry:
Open Windows Settings (Win + I).
Navigate to Apps > Installed apps.
Search for LG Monitor App Installer (or just “LG”).
Click the three dots (…) next to it and select Uninstall.
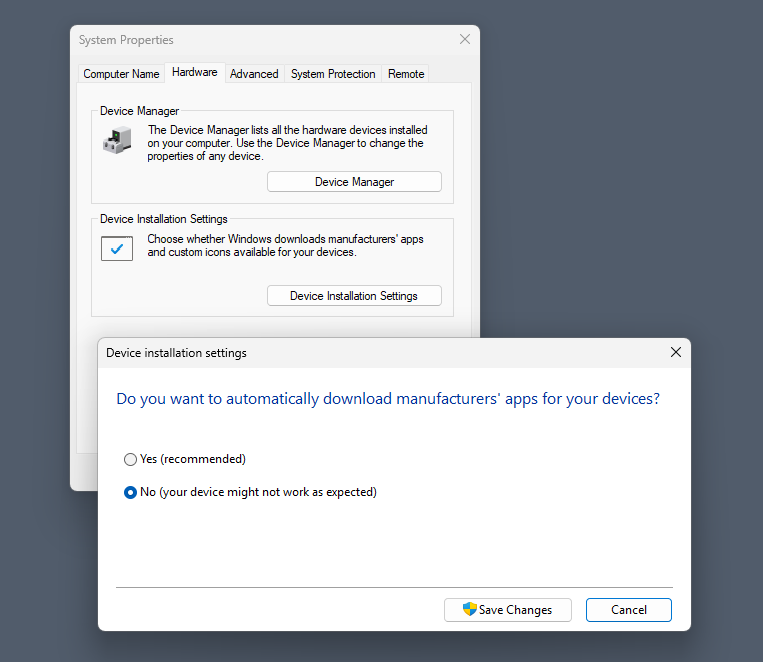
Prevent Windows from Auto-Installing Device Apps
Windows automatically downloads these OEM companion apps using a feature called “Device Metadata Retrieval.” You can disable this natively in the GUI:
Open System Properties: Press Win + R, type sysdm.cpl, and press Enter.
Navigate to Device Installation Settings:Select the Hardware tab, then click the Device Installation Settings button.
Disable Automatic Downloads:This stops all manufacturer companion apps.Select “No” (your device might not work as expected).
Save Changes:Click Save Changes and restart your PC.
Note that you can also make the change in the Registry or using the Group Policy.
Registry:
Press Win + R, type regedit, and press Enter.
Go to HKEY_LOCAL_MACHINE\SOFTWARE\Microsoft\Windows\CurrentVersion\Device Metadata
Find the DWORD named PreventDeviceMetadataFromNetwork. If it’s missing, right-click an empty space > New > DWORD (32-bit) Value and name it exactly that.
Double-click the key and change its Value data from 0 to 1. Click OK and restart your computer.
Group Policy:
Press Win + R, type gpedit.msc, and press Enter.
Navigate to: Computer Configuration > Administrative Templates > System > Device Installation.
Double-click Prevent device metadata retrieval from the Internet (or Prevent automatic download of applications associated with metadata, depending on your exact Windows build).
Set it to Enabled, click Apply, and restart.
Here is the effect
By disabling this feature, you are shutting the door on all OEMs. This blocks automatic, silent installations of software from ASUS (Armoury Crate), Razer (Razer Synapse), Dell (Alienware Command Center), HP, Logitech, and others.
Importantly, this will not break your hardware. Windows will still automatically load the basic, essential drivers required to make the device function.
Disabling this setting only stops the automatic background installations triggered by Windows. You retain complete control to install whatever you want, whenever you want.
If you decide you actually need an OEM companion app—for example, to configure mouse macros, change RGB lighting, or update hardware firmware—you can easily bypass the restriction manually:
Download directly from the manufacturer: Go to the official support page for your specific hardware (e.g., LG or Razer’s website) and download the driver package or software suite yourself.
Install via the Microsoft Store: Many of these OEM control panels are hosted on the Microsoft Store. You can simply search for the app by name and click install.
Turning off automatic metadata retrieval is highly recommended for keeping a clean OS. It shifts control from Windows back to you, ensuring you only install the companion apps you actually plan to use.
Many mobile phone users rely on the automatic backup feature of their devices. On Android, users can back up images and videos, settings, the call history or SMS.
Not all of the backed up data counted against the storage quota of the user, which is 15 GB by default for free Google account users.
While Google has been pushing users towards backing up photos and videos online, likely also to get them close to the free limit and push paid storage, it has discounted some data up until now.
This changes in less than two months. Google is emailing Android users currently about the upcoming change to Android’s backup storage policy.
The main change: All data counts against a user’s storage quota. Google says this includes things such as SMS messages, the call history or device settings.
The email reveals the extra storage requirements for the particular user, which was 0.07 GB in my case and should be around 40 MB on average. It seems unlikely that this will drive the quote of the majority users across the treshold.
Google is also extending the backup capabilities. When you open the back up other data section in the preferences, which Google says is rolling out, you find options to turn off backups for device data or app data. Each entry is listed with the storage it occupies on the device currently, making it easy to find the largest sections. However, there is no option to sort by data, which can make browsing the app data section time consuming.